Ever since posting a pic on my Face Book page about whipping butter, I have had many people ask me how do I make butter! I think we have this idea that it is difficult, like in the olden days, pull out the butter churn and churn butter for hours of labor. Well, thank the Good Lord, we have electricity! Making butter is simple. It takes about 10-15 minutes.
What you need: full fat, heavy whipping cream. This is a 32 oz bottle of cream I pick up from the dairy farm where I get my raw milk, the Best Cream Ever!
You also need a blender, but not a Vita-mix, this will heat the butter and you do not want it heated.
Strainer
Spoon
Containers for the butter and butter milk
Directions:
Allow cream to sit on the counter for an hour or so. If you have raw cream you can let it sit for 24 hours and culture some, makes the better taste even better. No need to worry about allowing your cream to sit for an hour or 24, it will be fine. You want it to warm up some so it goes faster!
Pour cream into blender and blend. If you have a smaller blender, do this in two or more batches, with mine being large, I can do it all at once. The cream is going to expand first, think of whipped cream, that is why you need room in the blender, so it can expand.
Expanded cream
After a few minutes of blending, it will begin to chunk up and separate, hard to tell in the pic, but there are butter chunks. Continue to blend for several more minutes until it is really chunky.
Like this!
There is butter and butter milk
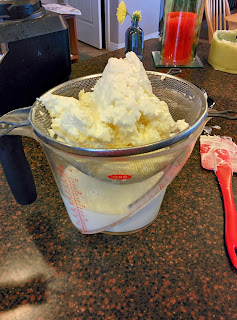
Then, pour and dump butter and butter milk out through a strainer. I have done it where I pour out the butter milk and then press the butter inside the blender and poured out the butter milk while I was going. Worked well, but so does a strainer.
Butter milk
Continue pressing through the strainer and scrapping the bottom of the strainer and placing butter back on top. It will go through the strainer and fall into the butter milk if you are not careful. This is why I have done it in the blender and pressed as much milk out as I could and then put it through the strainer.
Once you have gotten as much milk as you can, the more the better, you need to wash your butter. Pain in the butt, but you need to do it anyway. This is important to clean it. Place it back into the blender with some water, measure how much water you put in. Blend it again well and then strain again. Try to get as much water out, if not more than what you put in to wash the butter. If you want, you can do this with your fingers, nice oil manicure, or a cheese clothe to press out the water.
This is what I was left with, about half a quart jar of butter milk, more like 1% or skim milk, I mixed it with my raw milk to drink it, and two containers of butter. The larger one, I put in the fridge and the small one in the freezer. These two containers lasted us about a week. We go through butter! I have heard it should last about a week in the fridge, the more liquid you get off, the longer it will last. It will last for some time in the freezer.
After you have made the butter, you can flavor your butter if you would like:
Sea Salt
Chives
Garlic and onion
Whip it with honey
Blend with raspberries
Spicy butter
Really, the possibilities are left to your imagination.
Quick and easy and everyone will think you are amazing because you make your own butter!
Saving the world one stick, or batch, of butter at a time.
God bless,
Jenn


No comments:
Post a Comment